I want to start writing here again because it feels like original thought is becoming rare with the advent of AI. So I peeked at the GitHub repo of this website and, unsurprisingly, didn’t remember much about how or where it was deployed. Not having any GitHub Actions also didn’t help.
So I had to take a trip down memory lane and try logging into different platforms I had used in the past (fingers crossed that I had saved passwords). This is what I found:
- the website was hosted on Netlify with GitHub integration enabled for automated deployments (the hidden CD pipeline),
- DNS records were manually added on Cloudflare, which is the domain registrar,
- web analytics were manually ingested into a PlanetScale database, which had been dormant for over a year.
See the problem? Everything is hidden. There is zero visibility into infra. This never happens with the application itself because the behaviour is visible in the source code. So why not do the same for infra? That is exactly what an Infrastructure as Code (IaC) tool like Terraform does. I’ve known about Terraform for as long as I’ve known Docker, but I never got to use it first-hand and didn’t fully appreciate its value until this year.
Terraforming
The term terraforming reminds me of my childhood favourite game, RollerCoaster Tycoon 2. But here I mean using Terraform to manage an application’s infra resources. Have a look at the final architecture I went with:
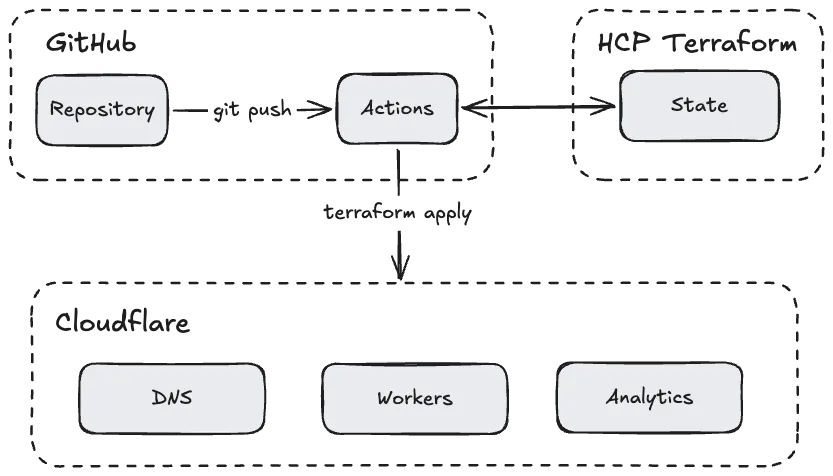
Note that the Terraform state lives in HCP Terraform, a third-party service I like. But it can be kept locally or in any external storage like S3.
The Cloudflare Stack
To make things simpler, I decided to fully adopt the Cloudflare ecosystem and move the static website, DNS records and redirects, and analytics to Cloudflare.
Terraform has providers for many cloud services, and there is an official one for Cloudflare as well. The first step was to create a resource for Cloudflare Workers, which is its serverless compute offering. It supports uploading static assets (HTML, CSS, images and other files) and serving them via Cloudflare’s global CDN. The code is straightforward: it creates a Worker that serves static assets from the project’s dist directory.
I could’ve used Cloudflare’s Wrangler CLI, which would have been even simpler to set up for a static website. However, I went for Terraform because I wanted it to be a single source of truth for all of my website’s infrastructure, including DNS and analytics.
Next, I wanted Terraform to manage DNS records. I deleted the manual records first and then added the DNS entry with this short snippet, where var.domain is mbinjamil.dev:
resource "cloudflare_workers_custom_domain" "site_domain" {
  account_id = var.account_id
  hostname   = var.domain
  service    = cloudflare_worker.site.name
}
You can peek the rest of domain.tf file here that contains the www-to-root redirect rule, and analytics.tf here that sets up Cloudflare Web Analytics for this website.
Deployment Pipeline
Terraform is two things: the code and the CLI. The code defines the resources you want, but they’re actually created by running terraform apply. It can run locally or in the cloud, as long as it has the right tokens.
For my website, I wanted hands-off deployments on every git push, so I run it in GitHub Actions. The workflow builds the website with pnpm build, then runs terraform apply, which uploads the static output from the dist directory to the Worker. The tokens for both HCP Terraform and Cloudflare are provided via GitHub secrets.
And that’s all, folks! Now the whole infrastructure for my website is defined in code. Nothing is hidden or ambiguous anymore. Everything is visible forever, to anyone, including AI agents!
References
https://registry.terraform.io/providers/cloudflare/cloudflare/latest
https://github.com/binjamil/mbinjamil.dev/
Futher Reading
https://blog.cloudflare.com/terraforming-cloudflare-at-cloudflare/